Dark Chocolate, Orange, and Fig Blondies

IMG_7775.jpg

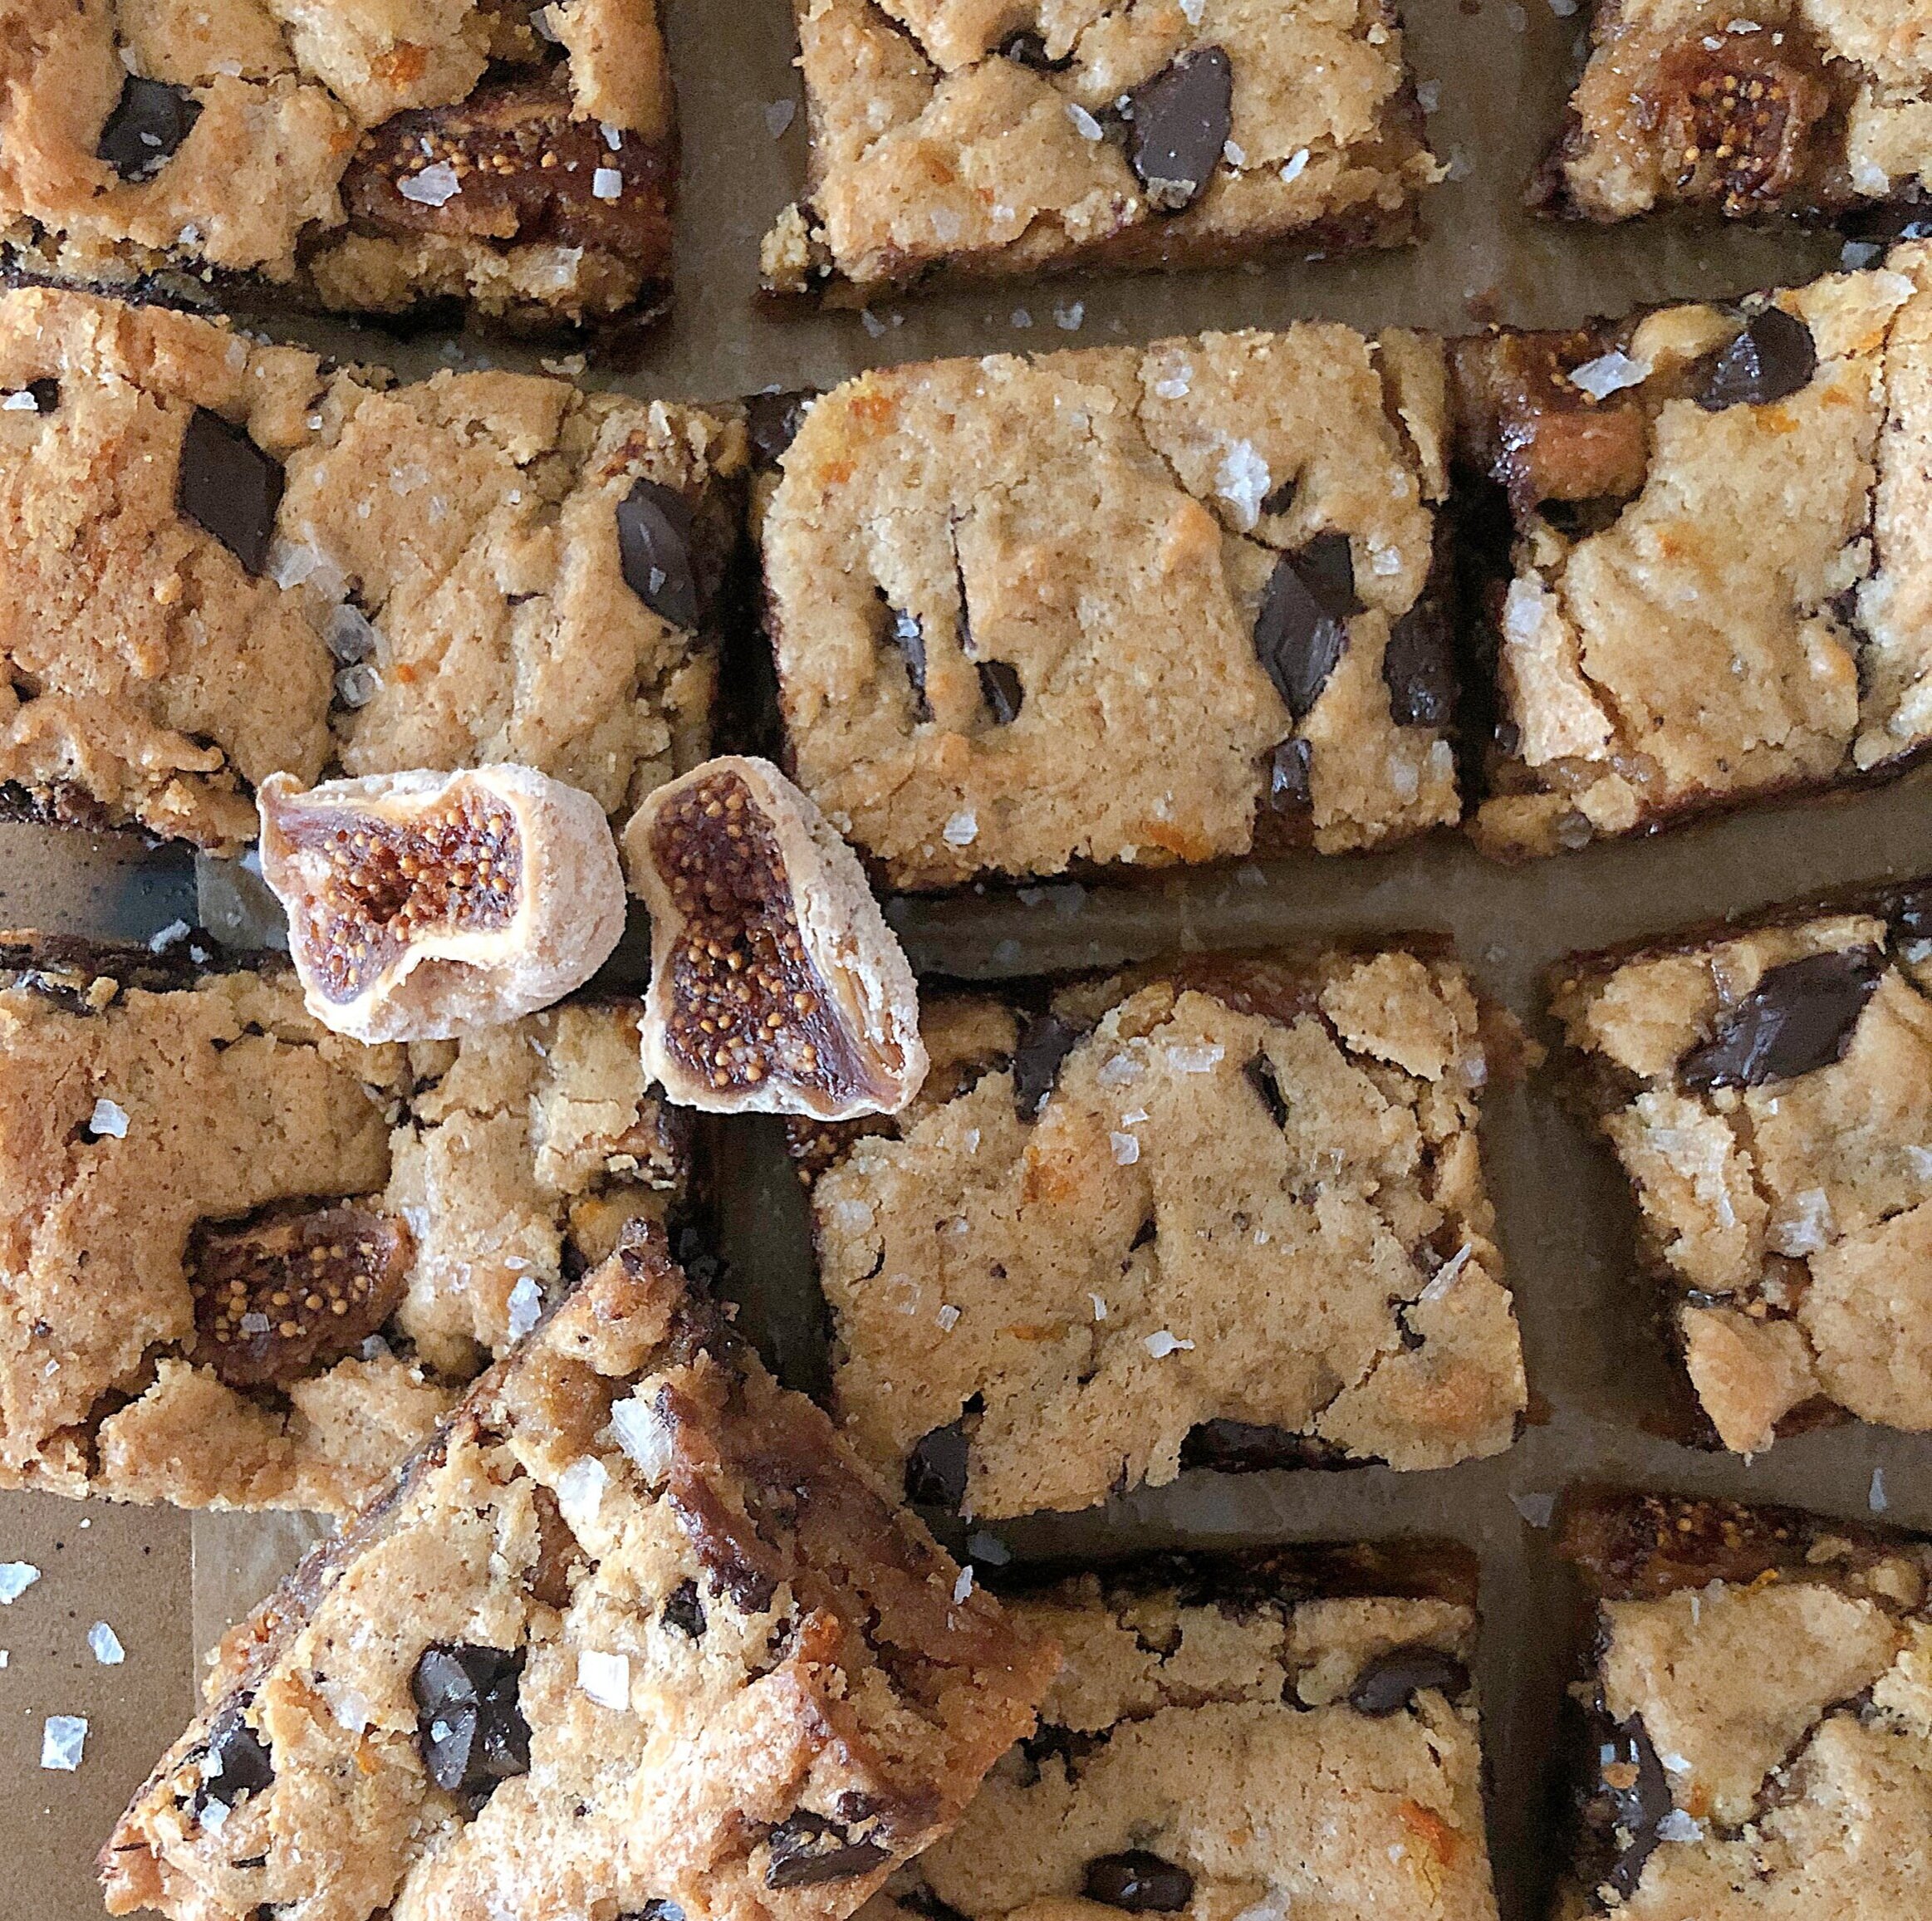
It’s been a baking week and it’s been great. I honestly haven’t baked in forever and it is truly my therapy. I’ve been feeling pretty creative with flavors and combinations and I’m leaning in. The Blueberry Cardamom Pop-Tarts from this week are delicious, these blondies are delicious. It’s been a tasty week y’all. I decided to make these blondies in an effort to update this ancient TAB recipe for Salted Caramel Fig Blondies. I love figs, but the caramel wasn’t necessarily a flavor I wanted to pair, so in comes this brand new recipe.

IMG_7777.jpg

If you follow me on social media, you may have seen the quest to get these blondies just right. I sought out to make them with fresh figs and not a lot of knowledge on blondies, and it was a fail. The fresh figs led to too much water content and I didn’t beat the sugar and eggs enough, so they came out a goopy mess on the inside. After researching blondies better and swapping from fresh to dried figs, these blondies found their truth!

IMG_7781.JPG

Let’s talk variations, because while I’m here for this combo these blondies are also very versatile. Chocolate and orange can be jarring for some. I’ve always been a fan of the combo and I think the orange is just the touch something this sweet needs, but if it’s not for you, ditch it. Fresh figs have a short 2-3 month season, but dried figs can be found year round. However, dried cranberries or dried cherries would be so delicious here. If you’re feeling nutty, throw in some walnuts.

IMG_7779.jpg

Dark Chocolate, Orange, and Fig Blondies
yields 12 blondies

Ingredients:
Β½ cup brown sugar
Β½ cup granulated sugar
Β½ cup (1 stick) unsalted butter, melted
1 egg
zest from Β½ an orange
1 tsp. vanilla extract
1 cup flour
Β½ tsp. baking powder
ΒΌ tsp. kosher salt 
6 dried figs, chopped
Β½ cup chopped dark chocolate (I used chips that I roughly chop)
Flaky Maldon salt

Directions:
Preheat the oven to 350 degrees. Line an 8x8 square pan with parchment paper or grease with baking spray.

In an electric mixer, mix the sugars, and melted butter until combined. Add the egg and beat on medium-high until light in color and fluffy. About 3-5 minutes. See the photo below for an example of what you are going for. This step is crucial to aerate the dough, which is what you want. Once light in color, add the vanilla extract and orange zest and mix to combine. On low, stir in the dry ingredients. Using a spatula, stir in the dark chocolate and chopped dried figs. Spread into your prepared pan and sprinkle with flaky salt. Bake for 25-30 minutes, until a toothpick comes out clean.

If you like things gooier, lend closer to 25-27 minutes, and if you want them more baked through, opt for closer to 30 minutes.

Let cool completely, remove from the pan, and slice into bars.

blondie batter_stella parks

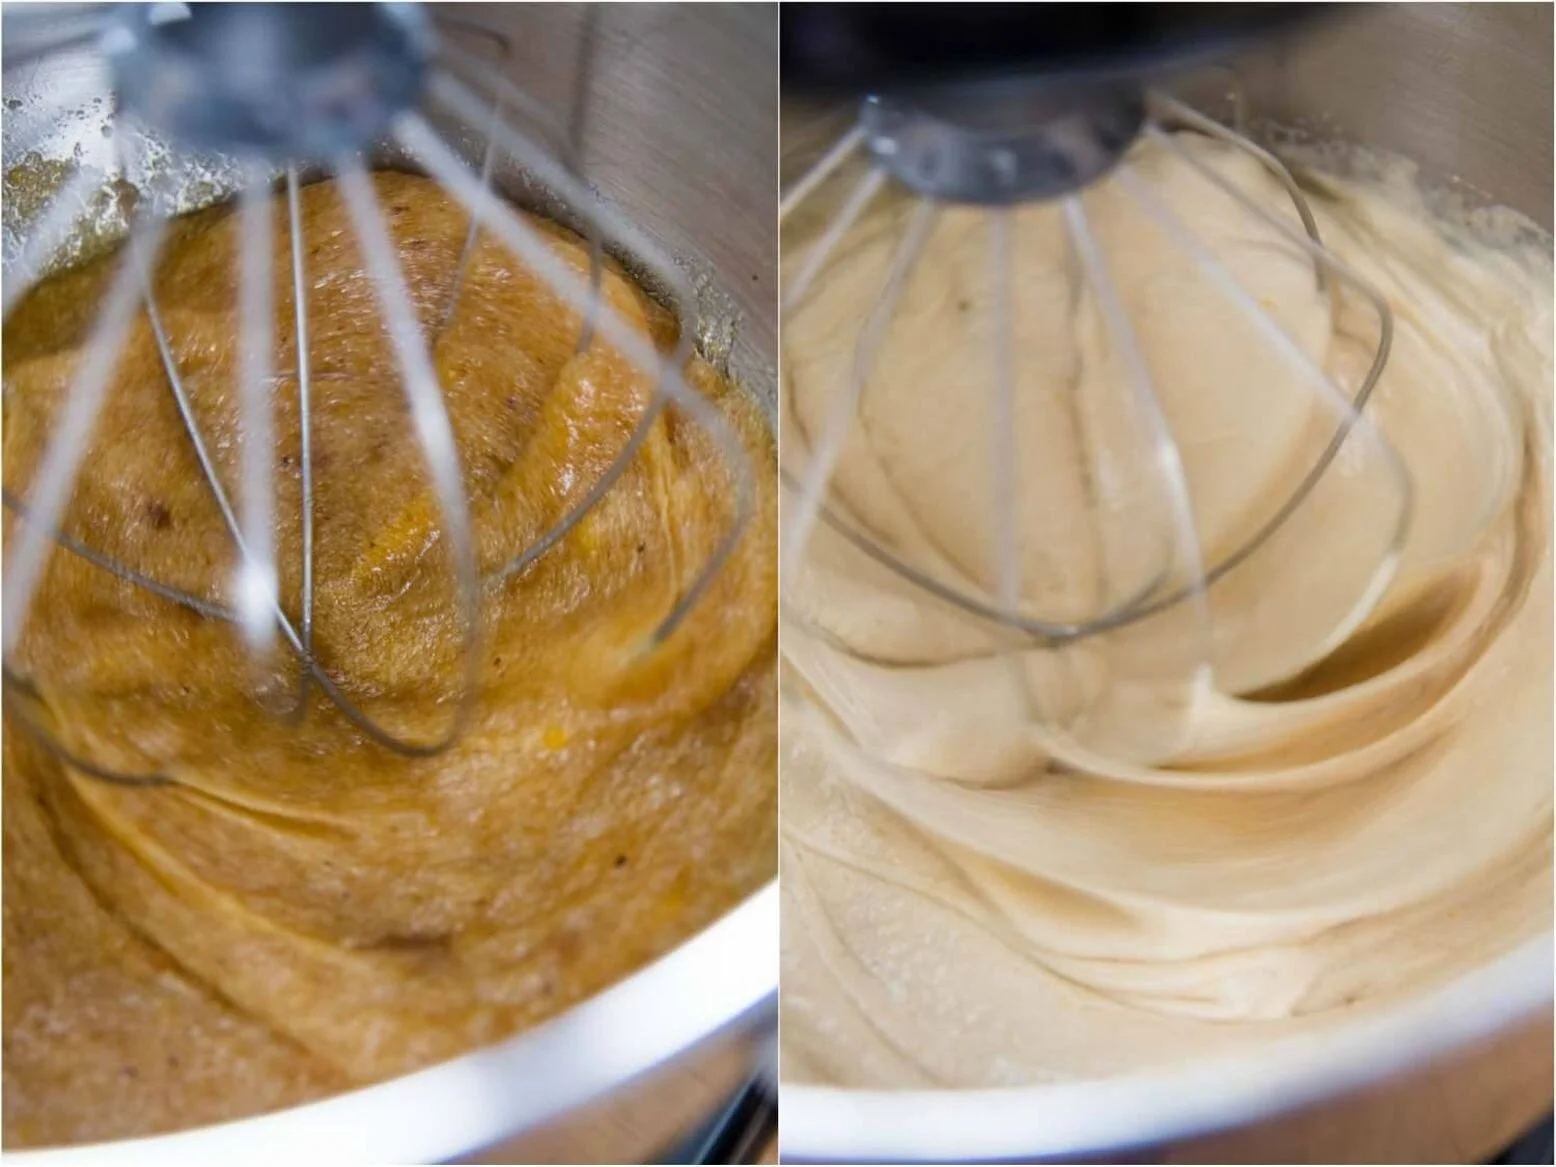
photo by Stella Parks

IMG_7773.jpg

Annie

Blueberry Cardamom Pop-Tarts

IMG_7701.JPG

My friend Lauren recently moved and became my neighbor at our apartment complex. I’ve lived in my apartment for a year and haven’t known a soul, but know I’m feeling settled and comforted knowing a few more faces around the place. She also just got back from a family trip to and around Glacier National Park. Lauren came back bearing gifts and brought me back a jar of blueberry jam made on a blueberry farm in Idaho.

IMG_7687.JPG

My mind instantly passed over jam on toast and skipped straight to using this little gift as the main ingredient in a baked good. I’ve made pop-tarts on the blog before, but I must be stalking Half Baked Harvest too much, and her unique pairing of flavors inspired these more mature pop-tarts. Blueberry and cardamom isn’t a typical pairing, but it’s not unknown.

IMG_7710.JPG

While quarantining with my parents I loved utilizing my mom’s spice cabinet to its full capacity and would sprinkle cinnamon and cardamom on my morning coffee. I’ve kind of been stuck on the flavor ever since and knew I wanted to use this unique spice in my tarts. The pastry is homemade, but don’t let it scare you. It really is a pinch to make and that’s where most of the flavor lies.

IMG_7689.jpg

Cardamom and cinnamon flavor the pastry, the Idaho blueberry jam works as the filling, and a little cardamom in the icing with crushed freeze-dried blueberries finish these off. I’m honestly just loving how pretty they are, but they are equally flaky and delicious.

IMG_7690.jpg

Blueberry Cardamom Pop-Tarts
yields 8 tarts

Ingredients: 
Pastry:
1ΒΎ cup all-purpose flour
2 tsp. sugar 
Β½ tsp. salt
1 tsp. cardamom
1 tsp. cinnamon
ΒΎ cup unsalted butter ( 1Β½ sticks), cold and cut into Β½ inch cubes
3 tbsp. cold water
1 egg (for egg wash)

Filling:
Β½ cup blueberry jam or fruit preserves

Icing:
1 cup powdered sugar
ΒΌ tsp. vanilla extract
pinch of cardamom 
1Β½-2 tbsp. of water
freeze-dried blueberries

Directions:
To make the pastry. In a food processor combine the flour, cinnamon, cardamom, salt, sugar and butter. Pulse until small clumps start to form. Add the cold water 1 tablespoon at a time. The dough may look dry, but let the processor do the work until the dough starts to come together. You don’t want the dough to be sticky, but if it is too dry you can add more water, 1 tablespoon at a time.

Turn the dough onto a floured surface and roll into a rectangular shape, 1/8-inch thick. Using a ruler or tape measurer, cut the dough into 3-inch x 4-inch rectangles. Take any extra dough scraps and roll back out to form more rectangles. The dough should make about 16 rectangles leading to 8 tops and bottoms. Transfer the 8 bottoms to parchment-lined baking sheets. 

To assemble. Spread 1 tablespoon of blueberry jam onto the center of the pop tarts, leaving a ΒΌ-inch border. Brush the egg wash along the exposed edges, and then carefully, using a metal spatula to help you transfer without breaking the dough, place another rectangle of pastry on top. With your fingers gently press around the filling to help seal the edges together. Using a fork, go along the edge to crimp the edges together. Repeat until you’ve used all of the dough. Poke a few holes or slice a couple of indentions in the tarts, for steam to release while baking. Place in the fridge to firm up for 1 hour or in the freezer for 20 minutes. 

Preheat your oven to 400 degrees. Bake the tarts for 18-20 minutes until the edges are just lightly golden brown. Let cool completely before icing. 

To decorate. Once the tarts are cooled, in a medium bowl, whisk together the powdered sugar, cardamom, vanilla extract, and water. If your icing is too thick, you can add more water, but you want the icing to be the consistency of thick paint so they don’t run right off the tarts. Spoon a little bit of the icing on to each cooled pop-tart. Using your fingers, simply crush the freeze-dried blueberries over the tops of the tarts, while the icing is still slightly wet. Allow the icing to harden completely, about 2 hours, before serving. 

*Recipe notes:
If you do not have cardamom
: You can omit it. However it really makes the recipe, so I suggest buying the spice from your grocery store's bulk spice section so you aren’t committed to a pricey bottle of spice. I love cardamom in my coffee. You can also use pumpkin pie spice in exchange for the cinnamon and cardamom. 

If you don’t love blueberry: This recipe would be great with a raspberry! Just swap for raspberry jam and freeze-dried raspberries. Any berry pairs well with cardamom.

If you don't have a Food Processor: You can use your fingers or a pastry cutter to mix the butter with the flour until the butter is pea-sized. Slowly drizzle in the cold water as directed.

To Make Gluten-Free: Use an equal amount of your favorite cup for cup gluten-free flour blend in place of the all-purpose flour. I actually used this GF flour in this recipe!

IMG_7712.jpg

Annie

Brussels Sprouts Salad with Avocado and Pistachios

I originally published this recipe in May of 2014. I can honestly say I have never made it again until now. It’s a little hidden gem hiding in the TAB archives and I’m excited to bring it back to life. The recipe has been slightly updated along with the photos and post.

FE994AF1-0ACA-47FF-8A6E-5076E1978E7C.JPEG

An excerpt from the original post 5/16/14:

Cooking for my parents is one of my favorite things to do! The one night I was gone this week I think my parents went into panic mode and didn't know what to do without me cooking dinner. They had to resort to take-out when their "personal chef" was gone. 

Mom, Dad, looks like 2014 is looking a little like 2020 during quarantine. Would you agree? At this time in May β€˜14 I had just finished my junior year of college and was home for a couple of weeks before moving to Washington D.C. for my summer internship with Scout. My parents had just moved into a new house and I was obsessed with cooking in their kitchen. Little has changed, their kitchen is still my favorite place to cook.

IMG_4768.jpg

How cool that recipes can instantly take you back to a certain time of life. Since I obsessively take photos of almost everything that goes into my mouth, I probably remember meals more than others. But I’m sure some of you can agree that a certain recipe can instantly have you travel back in time.

IMG_4765.JPG

Brussels Sprouts Salad with Avocado and Pistachios
serves 2 as an entree salad, and 4-5 as a side

Ingredients:
3 tbsp. olive oil
1 lb. brussels sprouts
1 small red onion or Β½ of one large onion, thinly sliced
Β½ cup unsalted pistachios, shelled and coarsely chopped
1 avocado, cubed
ΒΌ cup roughly chopped cilantro
juice of one lime
salt and pepper

Directions:
Trim the ends off the Brussels sprouts and thinly slice, so they look shaved. Cut the ends off of red onion and thinly slice into rings. Heat the olive oil in a non-stick pan over medium heat. Add the Brussels sprouts and onion to the pan. Season with salt and pepper and sautΓ© for 4-5 minutes until both are tender.

Stir in the pistachios and lime juice, and cook for 2 more minutes until the Brussels are lightly browned, the onions are starting to cook down and all the flavors are combined. Remove from heat and gently stir in the avocado and cilantro. Serve warm!

4AF0A213-92FE-488B-B2BB-008826960FF9.JPEG

Serve this as a side dish next to fish or even with barbecue. It’s also great as a hearty lunch salad and perfect enjoyed in spring and summer!

Annie

Coffee Cake Cookies with The Healthy Little Foodie

IMG_3514.JPG

When we look back at this time 10 years from now, I’m hoping that amongst the virus and the illness and the loved ones we may have seen suffered, I hope we also remember all the games we played, walks we went on, loaves of bread we baked and cookies we ate. I love how more and more people are getting in their kitchen more, baking and cooking up a storm.

IMG_3516.JPG

While I’m pretty used to working from home already, this new stay at home order isn’t too far from my normal. I’ve been busier which I’m so thankful for, but still working in the time to be in the kitchen. Quarantine brought a baking bug, and I’ve caught it. The baking bug has also come with a new push of creativity and confidence honestly. I started doing regular Sunday afternoon Instagram Live baking videos the first Sunday of self-quarantine and it was well, really fun.

IMG_3511.JPG

My friend Elyse has also been bit by the baking bug and coming up with all kinds of treats in her kitchen. Elyse bakes completely gluten-free and her recipes are typically made with no refined sugars and dairy-free. You can always count on Elyse for a healthier treat recipe. With all these Live videos and people β€œgoing live”" together on Instagram, I pinged Elyse if we should bake together and we jumped on the idea.

IMG_3512.JPG

So we would LOVE if you joined us this Sunday, April 19th at 1pm CST on Instagram! We came up with this recipe for Coffee Cake Cookies which is just really hitting all the trigger points for me right now. Crumb topping, fluffy cinnamon cookie. They taste like a buttery snickerdoodle with a crumb topping. Hi, hello, yum! The recipe can easily be made gluten-free and we give options if you want to use the OG flour and sugar or cleaner ingredients - ha!

IMG_3513.JPG

The Healthy Little Foodie + Take A Bite Coffee Cake Cookies 
Yields 20-22 (or 10-12) cookies
disclaimer: we developed this recipe during self-quarantine and assumed people didn’t need 20 cookies lying around, so we included the measurements to easily half this recipe.

Ingredients:

Crumb topping:
6 tbsp. (3) unsalted butter, cold and cut into small cubes
1/4 cup (2 tbsp.) packed brown sugar (sub for coconut sugar)
1/4 cup (2 tbsp.) granulated sugar (sub for monk fruit sugar or coconut sugar)*
1 (1/2) cup all-purpose or gluten-free flour
1 1/2 (ΒΎ) tsp. cinnamon
1/4 (a pinch) tsp. Salt

Cookies:
1 (Β½ cup or 1 stick) cup of unsalted butter, softened (we prefer Kerrygold or Vital Farms)
1 (Β½) cup packed brown sugar (sub for coconut sugar)
1/2 (ΒΌ) cup granulated sugar (sub for monk fruit sugar or coconut sugar)*
2 (1) eggs
2 (1) tsp. vanilla extract
3 (1Β½) cups all-purpose or gluten-free flour
2 (1) tsp. baking powder
1 (Β½) tsp. salt
1 (Β½) tsp. cinnamon
Powdered sugar or monk fruit powder for dusting 

*if you are using coconut sugar for both the brown and granulated sugar, use Β½ (ΒΌ)  cup for the crumb topping and 1Β½ (ΒΎ) cup for the cookies. 

Directions:
Preheat your oven to 350 degrees. Line a baking sheet with parchment paper and set aside.

In a small bowl, using your hands, a fork or a pastry cutter, combine all of the crumb topping ingredients. Work the butter into the dry ingredients until coarse crumbs are formed. Set aside.  

With an electric mixer, cream the butter and both sugars until light and fluffy. Add the eggs, one at a time, mixing until well combined. On low, add in the vanilla extract.

In a large bowl, whisk together the flour, baking powder, salt, and cinnamon. In batches, gradually add the dry ingredients into the mixer with the wet ingredients, until the dough comes together. 

Using a cookie scoop or spoon, form golf ball size balls of dough and place on prepared baking sheet 2 inches apart. Make an indention in the center of each cookie with the back of a teaspoon or your finger and fill with 2 teaspoons of crumb topping (be generous with your topping). Bake for 9-11 minutes or until golden brown around the edges. Remove from the oven and let cool on the pan. Then transfer to a wire rack to finish cooling. Once completely cooled, dust with powdered sugar and enjoy!

IMG_3515.JPG

We hope you have most of these ingredients already in your kitchen, if not, see if you can get all of the groceries delivered by Sunday so you can bake with us!

IMG_3517.JPG

Don’t forget! Come watch us on Instagram Live Sunday, April 19th, 2020 at 1PM CST! And if you are reading this post after our Live baking date I’ll be sure to link to the video we record.

Annie + Elyse

Homemade Oreos

I originally published this post in April 2013. It was my second post in the history of Take A Bite. Nostalgia! This recipe was originally not my own. I first saw them on my favorite blogger’s site back in the day and she too was sharing them from another blogger I used to love. Along with updated blog copy and photos, I also updated the recipe making them even more quintessential to the classic Oreo flavor. Enjoy!

IMG_1626.jpg

My cousin Clay loves these Homemade Oreos. Like brings them up about every other time he is with our family. For good reason, they are great. We were altogether about a month ago and they came up in conversation. I hadn’t made them in forever, and I’ve been loving updating old TAB archive recipes (see here and here so far), so this was a must on the β€œto bake” list.

IMG_1582.jpg

Switching gears a little, but does anyone else watch Bon Appetit’s YouTube series Gourmet Makes? Being the food freak that I am, I fall asleep to Claire Saffitz episodes remaking nostalgic junk food dishes. Her episode on Oreos was one of the first few episodes she filmed, but still one of my favorites. Long story short, but I felt like Claire Saffitz for a second while I re-made these! Maybe I should be calling them Gourmet Oreos?

IMG_1620.jpg

Homemade Oreos
yields 40 sandwich cookies

Wafer Ingredients:
1 cup unsalted butter, softened 
1 cup white sugar
2 tsp. salt*
2 eggs
2 cups all-purpose flour
1 ΒΌ cup unsweetened cocoa (you can use Hershey’s Extra Dark cocoa to resemble the dark color of a true Oreo wafer, but regular dutch process cocoa works great)
Β½ tsp. baking soda

Filling Ingredients:
ΒΌ cup unsalted butter, room temperature,
ΒΌ cup shortening, room temperature*
2 cups powdered sugar, sifted
1 teaspoons vanilla extract

Wafer Directions:
In a medium bowl, whisk together flour, cocoa, and baking soda and set aside.

In an electric mixer fitted with the paddle attachment, cream softened butter, sugar and salt on high until light and fluffy, about 1 minute. Scrape the sides down and then beat in the eggs one at a time until incorporated.

With the mixer on low, slowly add in the dry ingredients. Mix until the dough is combined.

Turn the dough onto a clean surface. Divide into two and form flat discs. Wrap in plastic wrap and refrigerate the dough for 30 minutes to an hour. 

Preheat your oven to 325 degrees. To roll out the dough, take one disc of the dough between two sheets of parchment paper (the dough can be rolled out on a lightly floured surface, but the parchment prevents any additional flour from altering the color/appearance of the dark cookies). Roll the dough between the two sheets of parchment to ΒΌ-inch thickness.

Using a 1Β½ inch round cookie cutter, cut out each wafer. Place on a parchment-lined baking sheet leaving only Β½ inch between each (they don’t spread much). Repeat until all dough has been used. Bake for 15 minutes, rotating pans halfway through. Remove cookies from oven and let cool on a cooling rack.

Filling Directions:
In an electric mixer, beat the room-temperature butter and shortening, powdered sugar and vanilla until light and fluffy. 

Assembly:
Using a pastry bag full of filling or a dinner knife, add a dollop of filling to one cookie. Top with another cookie and lightly squeeze together. 

Serve with a glass of milk and enjoy. 

Notes:
*When it comes to salt: Oreos cookies are not that sweet when you think about them. It’s the filing that makes them sweet. Don’t be alarmed by the low amount of sugar and a high amount of salt. It’s the balance you need to make the perfect bittersweet cookie to stand up to the filling. 

*When it comes to shortening: you can easily use Β½ cup unsalted butter instead of the butter/shortening combo. However, I think the shortening really gives you that nostalgic Oreo cream flavor.

My favorite part of these updated posts are sharing the original photography. Let’s all just take a moment to observe the Instagram filters being used here. I think these were maybe Amaro or Lof? What a time to be alive.

IMG_1625.JPG

With Valentine’s Day on the horizon, I couldn’t help but make a pink cream-filled version! I cut a little heart out of a few β€œtops” so more pink was revealed. Xoxo!

Annie